- Kauf auf Rechnung
- Sichere Bestellung
- Gratis Rückversand
- Bestell-Telefon 04231 - 66811
Anleitung Nr. 3314
Schwierigkeitsgrad: Einsteiger
Bist du auf der Suche nach einer kreativen Möglichkeit, deine Osterdekoration zu individualisieren? Lerne, wie du mit einfachen Techniken und ein wenig Geduld einzigartige Ostereier gestalten kannst. Folge unserer Anleitung, um im Handumdrehen faszinierende Designs zu kreieren und deinen Osterkorb zum leuchtenden Highlight zu machen!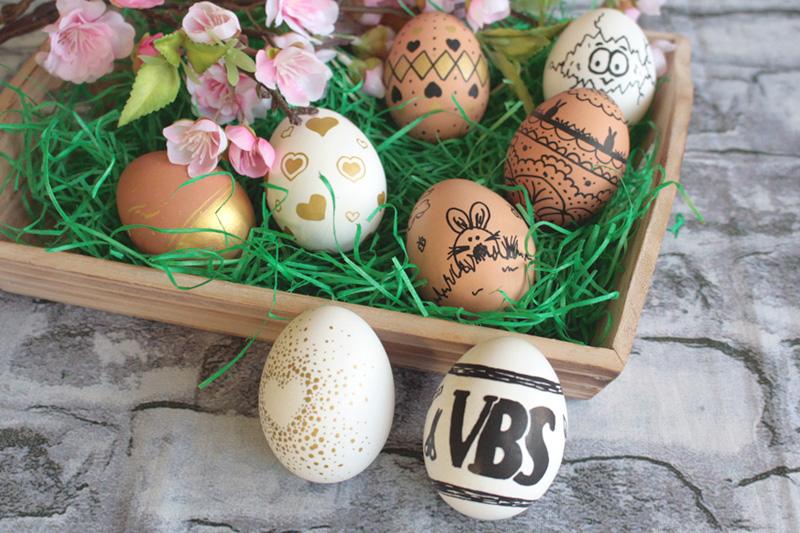

Schritt 1: Vorzeichnen
Deiner Kreativität sind keine Grenzen gesetzt! Entscheide dich für ein Design, sei es ein Name, ein Logo oder abstrakte Muster. Beginne damit, die Umrisse mit einem Bleistift leicht auf das Ei zu zeichnen. Dies hilft dir, eventuelle Korrekturen vorzunehmen, bevor du die endgültigen Linien ziehst.
Selbst bei einfachen Designs erleichtert eine Vorzeichnung den Prozess erheblich. Sollte nach dem Bemalen noch etwas Bleistift sichtbar bleiben, kannst du diesen leicht wegradieren.

Schritt 2: Eier verzieren
Jetzt beginnt der kreative Teil! Nimm dir die Posca Marker und die Acrylfarben zur Hand und lass die Magie beginnen. Achte darauf, die Farbe nicht zu verschmieren. Hier bietet es sich an, in kleinen Abschnitten zu arbeiten und jeden Abschnitt trocknen zu lassen.
Für die Goldfarbe empfiehlt es sich, mehrere Schichten aufzutragen und jede Schicht vollständig trocknen zu lassen. Ein borstiger Pinsel eignet sich hervorragend, um coole Kleckseffekte hinzuzufügen. Dazu etwas Farbe aufnehmen und mit dem Fingernagel über die Pinselspitze ziehen. Die Farbe spritzt dann beim Zurückschnellen auf das Ei.

Stelle sicher, dass der Arbeitsbereich gut... abgedeckt ist, um unerwünschte Farbflecken zu vermeiden. Viel Spaß beim Gestalten!

Für eine besondere Note kombiniere Gold und Schwarz nach Lust und Laune.
Vielen Dank, dass du unsere Anleitung gelesen hast! Hole dir jetzt alle Materialien in unserem Online-Shop und bringe deine kreativen Ideen zum Leben! Frohes Bemalen!